IPv6 home server with dynamic prefix for VPN, Web Server, RDP and Firewall setup guide
IPv6 is the new successor to legacy IPv4 which overcomes the shortages of IPv4 addresses since it only contains 4,294,967,296 IP addresses where as the smallest IPv6 block which is a /64 has 18,446,744,073,709,551,616 IPv6 addresses. The world is running out of IPv4 addresses and more and more ISPs are moving towards CGNAT (Carrier Grade Network Address Translation) which means instead of a public IPv4 address a private IPv4 address is assigned to users where services hosted on home does not work. If you are planning on setting up a server or remote access to your home or office using IPv6 then this guide is for you.
Preparing your Linux device or server.
This config is for networking /etc/network/interfaces
Now generate a new random IPv6 address suffix like this one ::71c6:b34f:8e2a:54f5 or your own easy to remember like ::2 or ::1000. In this example I will use ::71c6:b34f:8e2a:54f5 as my desired IPv6 address. Now edit the /etc/network/interfaces file and replace the code with this one replacing the token and gateway of your router.
# interfaces(5) file used by ifup(8) and ifdown(8)
# Include files from /etc/network/interfaces.d:
source /etc/network/interfaces.d/*

auto eth0
allow-hotplug eth0
iface eth0 inet dhcp

iface eth0 inet6 auto
	accept_ra 2
	up ip token set ::71c6:b34f:8e2a:54f5 dev eth0
For Netplan use this as an example
network:
  ethernets:
    eth0:
      match:
        macaddress: ab:cd:12:34:56:78
      addresses:
      - 192.168.1.10/24
      ipv6-address-token: "::71c6:b34f:8e2a:54f5"
      gateway4: 192.168.1.1
      gateway6: fd32:f949:d949:b66c::1
      accept-ra: true
      ipv6-privacy: true
      dhcp4: true
      dhcp6: true
      nameservers:
        addresses: [8.8.8.8, 2001:4860:4860::8888]
Save the file and reboot your server or Raspberry Pi.
Router configuration
Next step is to setup your router firewall where we will use the suffix 71c6:b34f:8e2a:54f5 to match the last 4 octects to a full IPv6 address. The prefix can be dynamic and can change whenever it wants and your server will continue to work fine. Now go to your router firewall, Asus and OpenWRT config is similar and use these values as an example.
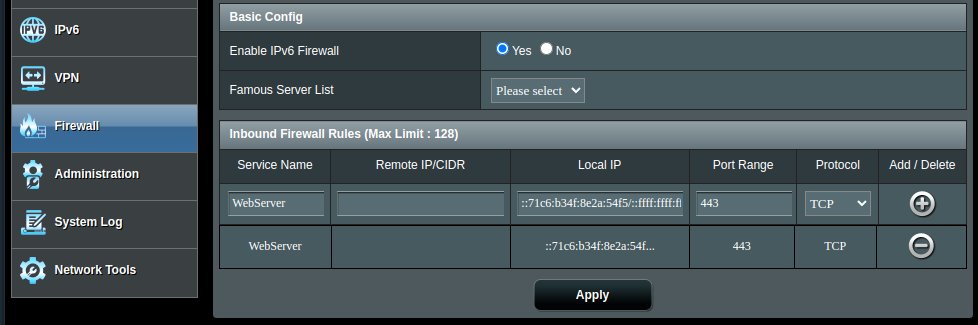
Asus router example
Service name: Your preferred name
Remote IP: Leave it empty
Local IP: ::71c6:b34f:8e2a:54f5/::ffff:ffff:ffff:ffff
Port: 443
Protocol: Select TCP or UDP or both that your service requires.
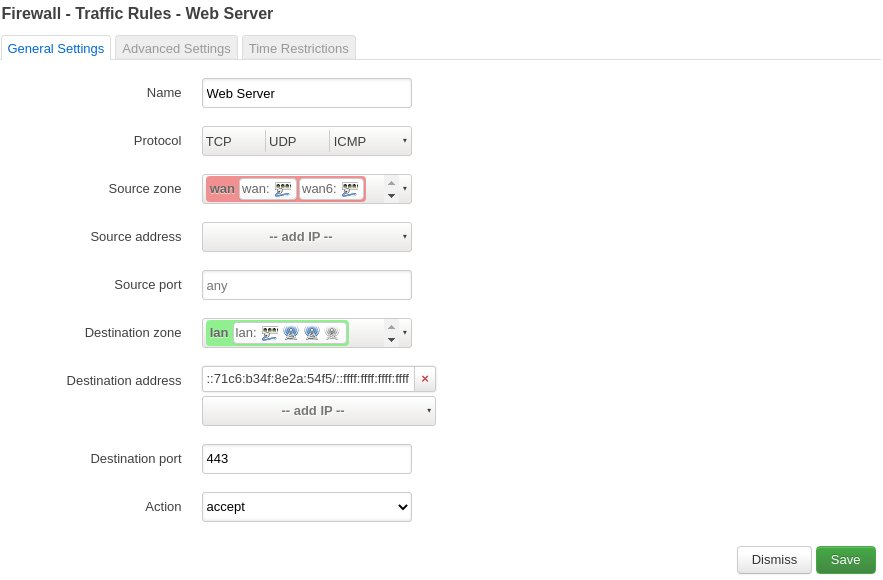
OpenWRT example
Network -> Firewall -> Traffic Rules -> Add
Now go to Advanced Settings tab and select 'Restrict to address family' -> 'IPv6 only'
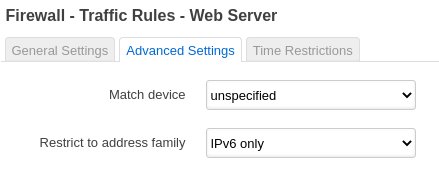
Save the firewall and you are done.
Keeping the server private
If you are planning on keeping your server safe from hackers and private you can use IPv6 privacy extensions. IPv4 addresses are always under constant attack and scanning since the address space is so small, it takes a couple of hours to scan the whole IPv4 address space and exposing your home network on the Internet is not a good idea. IPv6 privacy extensions keeps generating temporary IPv6 address at a certain interval, like every 24 hours your server will use a different IPv6 address to communicate on the Internet. This way your outbound IPv6 address will be different from your inbound IPv6 address. To do this edit the file /etc/sysctl.conf and add these commands after net.ipv6.conf.all.forwarding=1
net.ipv6.conf.eth0.accept_ra=2
net.ipv6.conf.eth0.use_tempaddr=2
net.ipv6.conf.eth0.temp_prefered_lft = 86400
net.ipv6.conf.eth0.temp_valid_lft = 90000
Dynamic DNS script
If you need a bash or shell script to update your DNS server then go here for an example script ❯ LINK
Hopefully now you should get a working home IPv6 server or a VPN connection with inbound IPv6 address.
Let me know if you have any comments or if there is any bug or error in this guide.